Published on 16 Apr 2013
Incognito Auto Configuration Server is a fast and agile end-to-end platform for deploying TR-069 related services, allowing you to:
Published on 16 Apr 2013
Incognito Auto Configuration Server is a fast and agile end-to-end platform for deploying TR-069 related services, allowing you to:
Before any of this can occur, however, you must first provision the relevant TR-069 enabled
devices using Auto Configuration Server. This process does not need to be complicated and the
following guide demonstrates how it is possible to provision a TR-069 device in as little as 15
minutes using Auto Configuration Server.
You can also see if your device meets the TR-069 standard and find out whether it will work
seamlessly with Auto Configuration Server by joining the free Incognito TR-069 Open Interop
Program. This program allows you to test your device with Auto Configuration Server before it is live on your network.
TR-069 has evolved to become an important management tool and many device vendors have
opted to add support to existing hardware to comply with the standard. It is not uncommon for
vendors to offer limited TR-069 support in earlier firmware releases before adding further TR-069 features in subsequent upgrades.
The first step is to ask the device vendor whether the device supports TR-069. You will need to
know:
This information should tell you whether the device can be used in a production environment or if it should only be used in the lab. It will also tell you whether there are any known firmware issues that will affect how the device performs with Auto Configuration Server and whether there are likely to be any changes in the future.
After obtaining the required vendor information and ensuring the test device can support
TR-069 on its current firmware, the next step is to obtain an IP from the DHCP server. This step
is necessary for connectivity between the device and Auto Configuration Server to occur. You will need to ensure that your DHCP server is ready for configuration and able to answer the request for an IP address. Check your DHCP server to make sure there is an active lease for the device.
Incognito Broadband Command Center is an example of a device provisioning system that has
a DHCP component. If using Broadband Command Center for DHCP, you can check the lease
information through the Java Incognito Management Console (JIMC). Check your vendor’s user
guide if using a different DHCP server.
The device now needs to connect with Auto Configuration Server. An HTTP or HTTPS address is used to contact Auto Configuration Server under TR-069. An example of each type of address is below:
HTTP: http://acs.example.com:7547/service/cwmp
HTTPS: https://acs.example.com:8048/service/cwmp
Check the vendor’s documentation to determine what URL should be used for the test device.
Note that not every TR-069 device will behave the same way during this stage of configuration.
Below are four scenarios that outline how different devices may contact Auto Configuration
Server:
Each of these scenarios is explained in further detail below.
This scenario relates to both wireline and cable operators. If the device requires the TR-069 URL
to be set with a DHCP option, this will most likely be the DHCP Vendor Specific Option 43.1.
You will need to use a DHCP management server to set the TR-069 URL in this scenario.
Incognito Broadband Command Center is an example of a device provisioning system that has a
DHCP management server component that may be used. Refer to your DHCP vendor’s user guide for further details if not using Broadband Command Center.
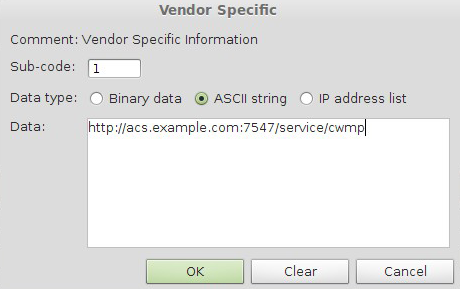
If using Broadband Command Center, you have the option to create a Client Class with relevant
matching criteria, such as Vendor, Model or MAC. The DHCP Option 43.1 can then be added as
an ASCII string URL, as shown below:
Note that devices with multiple MAC addresses, such as lightweight, dual-stack cable modems
with in-built routers, known as eRouters, will behave differently. These devices should assign
DHCP Option 43.1 to the CPE MAC and not to the cable modem. If this situation applies, make
sure you check the lease information in your DHCP management server to ensure the device is set to the relevant option.
This scenario relates to cable operators only. CableLabs developed the eRouter specification to
extend address provisioning to devices that employ stateless address auto configuration (SLAAC),
a provisioning mode that is not used with DOCSIS. This specification enables cable modem
vendors to now deploy gateway devices using these lightweight, dual-stack eRouters.
For this process to occur, the DHCP management server will assign individual IPs to the cable
modem and eRouter. The most common configuration is for the Auto Configuration Server URL to be defined within a DOCSIS File Setting. If using Broadband Command Center, you can define the Auto Configuration Server URL and assign to a Broadband Command Center Client Class. Again, if you are using a DHCP server other than Broadband Command Center, you will need to refer to your DHCP vendor’s user guide for specific information.
The device vendor will provide the exact settings to use but in practice this is usually TLV11 or
TLV43. If using Broadband Command Center, refer to the screen shots on the following page for
configuration examples of both TLV11 and TLV43 in Broadband Command Center DOCSIS File
Settings.
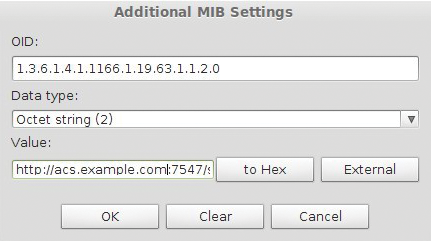
Example 1: TLV11
Under the SNMP tab, click on Additional Settings and then User Specified Additional MIB Settings to define the OID and data type. You will also need to specify the URL in the value field, as shown below:
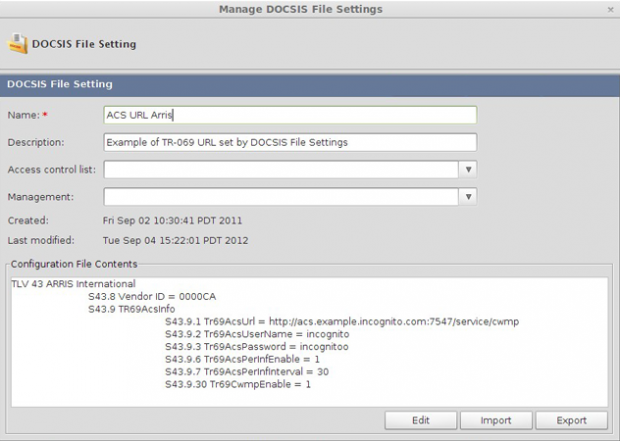
Example 2: TLV43
First, define the vendor specific type-length-values (TLVs) in DHCP. You can do this by selecting
Service Configuration, then clicking Advanced Options, and then DOCSIS TLV Definitions.
From there, you will need to define the vendor ID and URL in the DOCSIS File Settings, as shown below:
In a lab setting, one of the quickest ways to set the Auto Configuration Server URL is to connect
to the CPE LAN port on the default local IP. Many TR-069-capable gateway devices, such as
broadband routers, are defined this way. In a production environment, you may set the URL in
the vendor firmware and you could also potentially set the URL to a load balancer to provide fault tolerance.
The default local URL, login username, and password are usually found on the bottom of the
device. Common defaults are:
URL: http://192.168.1.1
Username: admin
Password: admin
When connected to the local URL, the Auto Configuration Server URL settings typically are
defined under a management section in the graphic user interface (GUI). This will normally be
labeled TR-069, Auto Configuration Server, or CWMP, depending on the vendor.
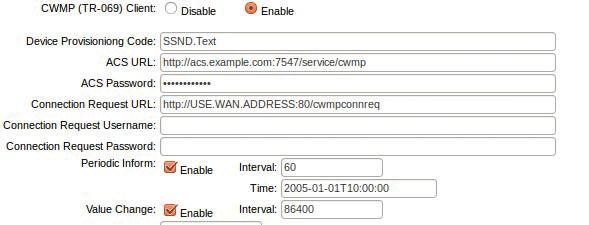
The following is an example of typical manual configuration:
For some vendors it may be necessary to manually define Auto Configuration Server URL using
telnet or secure shell (ssh) command line tools. This usually has the same IP as the local URL with a similar username and password. If manual definition is required, look for a section called TR-069, Auto Configuration Server, or CWMP when logged on to the telnet or ssh session and set the URL as appropriate.
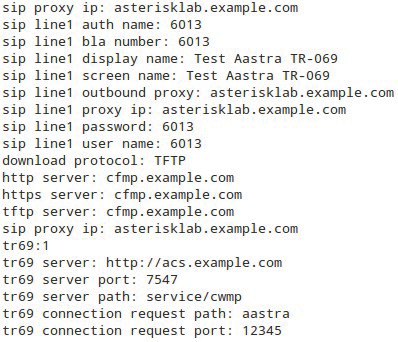
This scenario relates to wireline operators only and refers specifically to TR-069-cable SIP
phones. The typical way of defining the Auto Configuration Server URL in this scenario is via an
XML configuration file.
You can use a DHCP management server such as Broadband Command Center (Broadband
Command Center) to download the XML configuration file. The DHCP server will tell the TR-069 device where to find and download the file. If using Broadband Command Center, this occurs using the CFM/CFMP products. An example configuration is shown below.
Once the TR-069 device has a set URL, Auto Configuration Server will attempt to discover the
device following the protocol specifications. In the majority of cases Auto Configuration Server
GUI devices view will show the device as ‘synchronized’. This indicates that the process has been successful and instant management and configuration can occur.
You can easily tell if the device has not successfully synchronized, as the devices view will show
the status as ‘discovery failed’. This indicates that there has been a problem with the device or the discovery process. If this occurs, check the CWMP and Auto Configuration Server service logs for details to assist you with troubleshooting. If you are unable to find the problem, contact Incognito support by phoning toll free 1 (800) 877-1856 (North America only) or +1 (604) 688-4332 or visit https://www.incognito.com/support.
Provisioning a TR-069 device using Auto Configuration Server does not need to be complicated
and can be completed in as little as 15 minutes. This provisioning process enables you to roll out
new services, reduce operational costs, and gain an unprecedented level of visibility and control
over customer-premises equipment (CPE).
Auto Configuration Server offers secure and reliable network-agnostic provisioning across a
wide range of access networks, including xDSL, PON, WiMAX and cable systems and supports
nearly every TR-069 device on the market. Auto Configuration Server stands apart for its agility,
speed, and ability to roll out customized reports and TR-069 services such as WiFi management, parental controls, managed QoS, SMB VoIP and IPTV without affecting performance. It also allows for device backup and has excellent device visibility, including options for user-friendly online subscriber portal.
To affirm TR-069 readiness and to ensure compatibility with Auto Configuration Server sign up for the free TR-069 Open Interop Program by contacting us at www.incognito.com/contact/. For more information about the Incognito suite of products see www.incognito.com/products.
With over 30 years of experience, Incognito has helped global providers accelerate and innovate broadband services, with a unique focus on cable, fiber, and mobile broadband technologies.
Vancouver, Canada (HQ)
Ottawa, Canada
Dublin, Ireland